Pages

Showing posts with label Dessert. Show all posts

Strawberry Mousse


Ingredients:

Strawberries - 250 gms
Gelatin powder - 3 tsp
Powdered sugar - 100gms
Whipping cream - 200 ml

Directions:


  1. In a small bowl take 4 tbsp of water. Sprinkle gelatin powder on top and keep it aside
  2. Blend strawberries. Add 50 gms of powdered sugar and mix well
  3. Add gelatin mixture in blended strawberries and keep aside
  4. Take whipping cream in a glass bowl and whip it until soft peaks are formed. Add remaining sugar and whip it further for one minute until sugar get incorporated well
  5. Fold in blended strawberries & gelatin mixture in whipped cream, taking care that aeration in whipped cream is retained
  6. Pour the mixture in small mousse glasses and keep it in refrigerator for at least 4 hours
  7. Serve chilled


Fresh Fruit Tart


December has already started and it is the season for fresh strawberries. This weekend, I decided to make Fresh Fruit Tart. I considered using fresh strawberries, mulberries, kiwi and dragon fruit for the topping.

Tart is a baked dish with a shortcrust pastry as the base with usually custard filling and topping.

Ingredients

For Pastry Crust

Maida (all purpose flour) - 200 gms
Unsalted Butter - 150 gms
White sugar - 50 gms
Salt - 1/8 tsp
Egg - 1
Cold water - 2 tbsp

For Pastry Cream

Milk - 300ml
Egg yolks - 3nos
Maida - 20gms
Corn flour - 20gms
Vanilla extract - 1 tsp

For Topping

Strawberries - 15nos
Kiwi - 2 nos
Dragon Fruit - 1no

For Glaze

Corn flour - 1 tbsp
White sugar - 50gms
Water - 1 cup

Instructions:

For Pastry Crust

  1. In the food processor bowl, take maida. Add sugar and salt
  2. Cut cold butter in 1/2 inch cubes and add to maida
  3. Lightly beat the egg and add to maida
  4. Turn on the food processor and pulse it until all the ingredients just come together and forms the texture of small granules. If necessary, add 1 tbsp of cold water (if mixture is not coming together)
  5. Take out the mixture and place on the clean working platform. Bring all the ingredients together to form a ball. Do not over work the batter otherwise pastry crust will not be light after baking.
  6. Flatten the ball in the form of the thick disc, cover it with cling wrap and keep in the refrigerator for 30 minutes
  7. Take 8-9 inch tart mould with loose bottom. Grease it with butter
  8. Remove the pastry disc from the refrigerator and roll it on the clean working platform using rolling pin. The size of the rolled pastry should be at least 3-4 inches more that the diameter of the tart mould (Instead of flattening using rolling pin, I placed the pastry ball in the mould and flattened it evenly using fingers and palm while raising the pastry over the edges of the mould.)
  9. Transfer the rolled pastry in the mould, press lightly with fingers along the inside edge of the mould and cut excess of pastry hanging over the mould top using knife.
  10. Keep the pastry along with mould in the freezer for 15-20 minutes
  11. Pre-heat the oven at 200 degrees centigrade
  12. Take out the pastry and mould from the freezer, prick the bottom of the pastry.
  13. Bake the pastry in the oven for 5 minutes at 200 degrees centigrade
  14. Reduce the temperature to 180 degrees and back until crust turns light brown (around 15-17 minutes)
  15. Turn the oven off, take out the baked pastry and allow it to completely cool
  16. While crust is warm, apply either apricot glaze or lightly beaten egg whites on the inside surface of the crust. This prevents the crust becoming soggy once pastry cream is poured inside the crust
  17. Once cooled, remove the bottom of the mould 
  18. While pastry crust is getting cooled, prepare pastry cream

For Pastry Cream

  1. Separate egg whites and yolks
  2. In a bowl, take 3 egg yolks and mix well with sugar
  3. Sift maida and corn flour in the egg yolks and mix well until smooth paste is formed
  4. In the sauce pan, bring the milk to just boil (until milk starts foaming up)
  5. Remove the sauce pan from heat and pour small quantity in the egg yolk mixture while whisking constantly. This is called tempering of the egg yolk mixture
  6. Slowly add the remaining milk in the egg yolk mixture while continuously whisking
  7. Pour back the above mixture in the sauce pan and keep it on the gas stove on medium heat.
  8. Whisk continuously (this will avoid curdling of the egg yolk mixture) until the mixture thickens with the custard like smooth consistency (around 1 minute or so). Whisking continuously will also help avoid any lumps being formed
  9. Remove it from the heat and allow it cool completely. Cover the surface of the pastry cream with cling wrap to avoid formation of the skin
  10. Once cooled, add vanilla extract and mix well.

For Glaze

  1. In a small pan, take sugar, corn flour and water
  2. Bring the mixture to boil 
  3. Remove it from the heat and allow to cool completely. The mixture will be slightly thickened

Assembling the tart

  1. In the cooled pastry crust, spread the pastry cream evenly
  2. Slice the strawberries, kiwis and dragon fruits
  3. Arrange the fruit slices on top of pastry cream in concentric circles or any other decorative form
  4. Using pastry brush, apply cooled glaze on the surface of the fruits. This glaze bring shine to the surface of the fruits as well as prevents the fruits from turning stale
  5. Store the tart in the refrigerator until served.
  6. We can use any other fruits of your choice as well
Rolled crust inside the tart mould

Baked pastry crust

Pastry cream getting thickened
Ready and cooled pastry cream
Assembled Tart

Glaze applied on the tart

Assorted Donuts / Doughnuts

Recently I have been hearing about many outlets selling donuts in Bangalore and people going "mad over donuts" :-).....So, I decided to try making these donuts which turned out to be relatively simple. There is no baking but deep frying involved in this recipe (of course we can make baked donuts as well but I deep fried them). Donut can be termed something in between bread and cake....Bread because yeast is added and cake because butter is added. We can enjoy donuts anytime of the day, be it breakfast, snack or even meal by itself! 


Ingredients:


For Donuts - 

Plain flour (maida) : 3-1/4 cup + for dusting
Powdered Sugar : 1/4 cup + for dusting
Active Dry Yeast : 2 tsp
Milk : 3/4 cup
Eggs : 2
Softened unsalted butter : 110 gms
Vanilla Essence : 1 tsp
Oil for deep frying

For Glaze - 

Granulated sugar : 1/4 cup
Milk : 6 tb sp
Dark chocolate : 50 gms (tempered)
Rainbow sprinkles


Method:


  1. In a bowl, sprinkle active dry yeast over luke warm milk. Add 1 tsp sugar to help activate the yeast. Keep it aside for 10-15 minutes until yeast foams well
  2. In another big bowl, sieve the flour so that it gets aerated well. Add to it 1/4 cup of sugar and mix well
  3. Beat two eggs lightly with the help of fork and add it to the flour. Add vanilla essence and mix it well with spatula
  4. Add well foamed milk and yeast mixture and also softened butter. Mix well and bring all the ingredients together
  5. Knead the dough for 5 minutes until it is forms a soft ball and no longer sticks to the bowl
  6. Keep in a warm place for 1 to 1.5 hours or until the dough doubles up in volume
  7. Punch the dough to take out the air from dough and allow to rise the dough again for 30 minutes
  8. Once again punch the dough and then keep it in freeze for 30 minutes so that the dough becomes pliable for rolling
  9. Lightly dust the floor with some flour and then roll the dough using rolling pin in 1/2 inch thick round. (For small / mini donuts, keep the thickness to 1/4 inch)
  10. Using donut cutter, cut out the donuts and arrange it in tray / plate. Keep covered using plain cloth at a warm place for 30-45 minutes until these donuts rise again
  11. Deep dry donuts in oil on medium until these turn golden brown and place these in a plate
  12. Dust the powdered sugar on the hot donuts
  13. For chocolate donuts, dip the cooled donut in tempered chocolate and take it out. Take rainbow sprinkles in a plate. Dip the wet chocolate side of donut in the sprinkles so that it gets coated well. Arrange it in plate
  14. For sugar glaze, mix granulated sugar and milk in pan and boil until sugar dissolves and mixture thickens a bit. Allow it cool. Dip the donuts from one side in the glaze and arrange it on the plate
  15. Serve the donuts either warm or even cold


Pavlova Miniatures

Yesterday, I had been for lunch at a restaurant and they had Pavlova as one of the many options for dessert. Pavlova is meringue based dessert having delicate but crisp crust and soft marshmellowy center. It is typically served by decorating the top with whipped cream and fresh fruits like Strawberries, Kiwi, Passion Fruits etc. This dessert is said to be created first either in Australia or New Zealand. After having tasted this lovely dessert, I decided trying to recreate it.


The base of Pavlova is made by slow baking the firmly beaten egg whites and then garnishing it with whipped cream, fruits crush and fresh fruits.
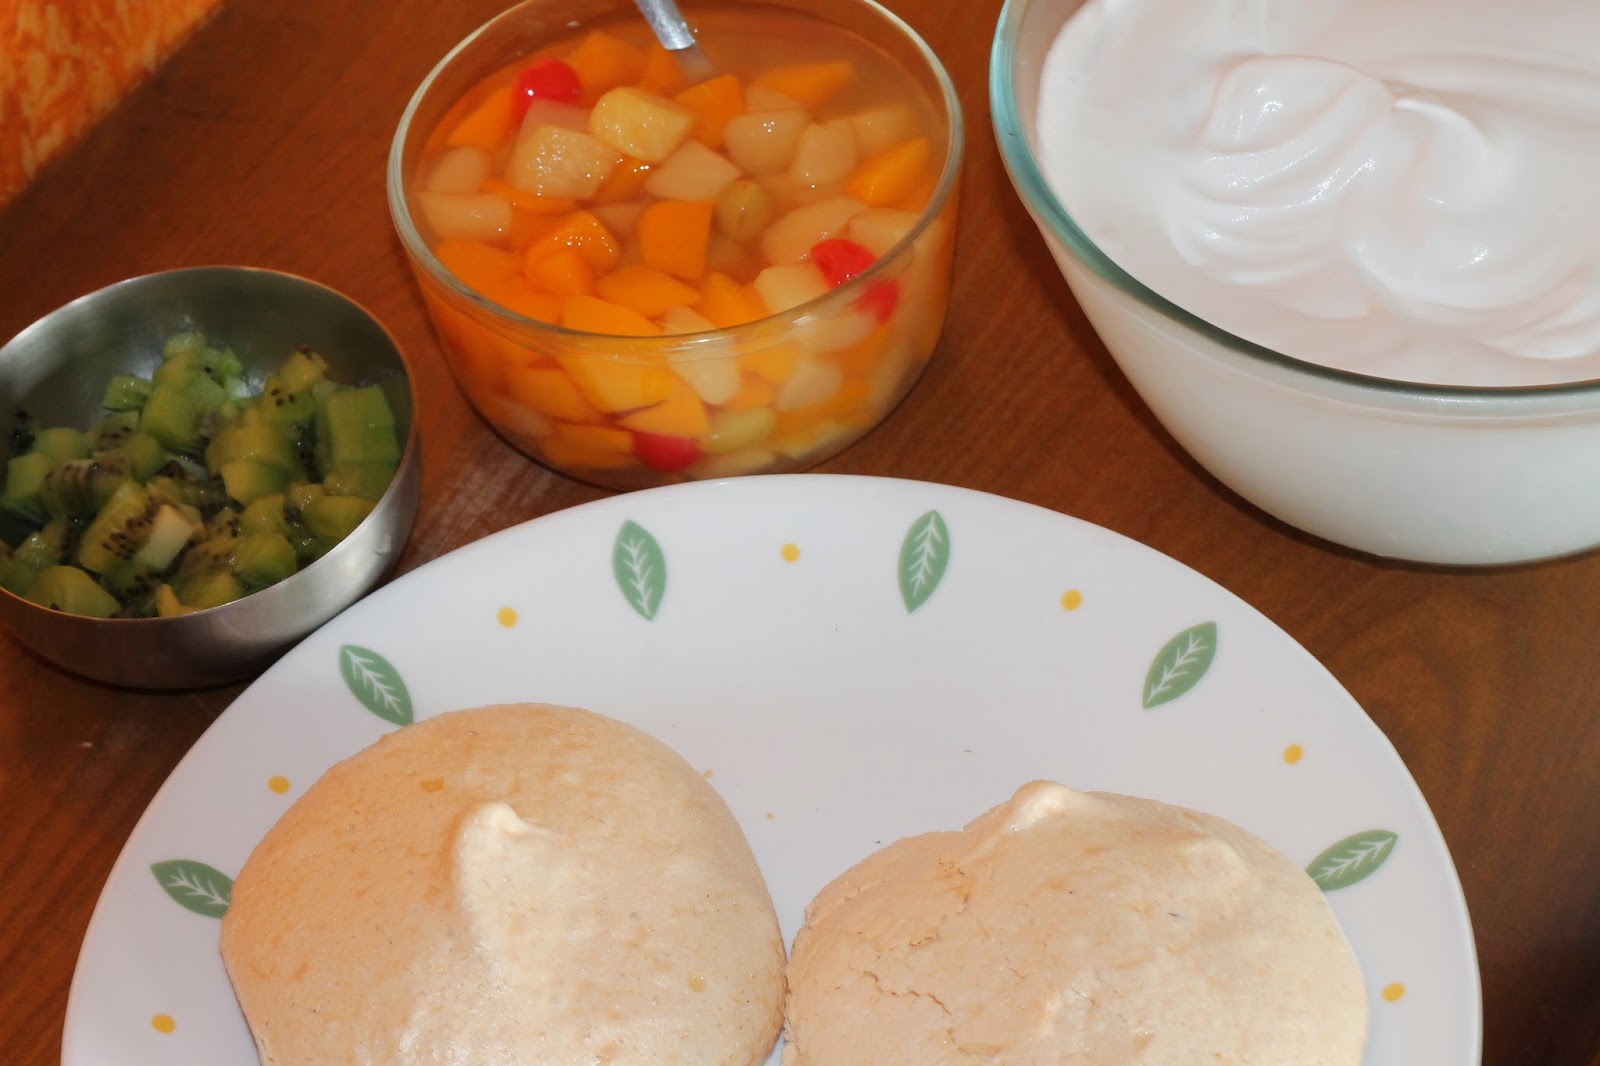
Baked Meringue Bases, Whipped Cream and Fresh Fruits

Ingredients


Egg Whites - 4 (make sure not even a drop of egg yolk is mixed)
White Sugar - 225 gms (finely ground)
Cornflour - 2 tsp
White Vinegar - 2 tsp (you can substitute it with lemon juice)
Vanilla Essence - 1 tsp
Whipping Cream - 250 ml
Kiwi Fruit - 2 nos.
Peach - 1 no.
Strawberries - 10-12
Fruit Crush - 3/4 cup (I used Mala's Very Berry crush)

Makes 9 Pavlova miniatures of 4 inch diameter

Method

  1. Pre-heat the oven at 150 degrees centigrade
  2. In a sufficiently big bowl take egg whites and beat until they hold firm peaks but are not stiff
  3. Gently add sugar, one spoon at a time while beating continuously. Make sure that all the sugar is dissolved completely and then beat further until you get snowy and shiny meringue but it is not dry. (Ensure not to over beat the meringue else egg whites loose volume and deflate when folded with other ingredients)
  4. Sprinkle cornflour, vinegar and vanilla essence on top and gently fold in the meringue to combine
  5. In the baking tray, keep the silicone baking sheet (alternatively you can use baking sheet lined with parchment paper)
  6. Spoon the meringue on the baking sheet and spread in approximately 4 inch diameter circles with 1 inch spacing between them. Try to make the rim little higher than the center so that it can hold whipped cream and fruits later (unfortunately, my meringues were not indented in center. You can use backside of the spoon to make indentation in center)
  7. Put the baking tray in the oven, reduce the temperature to 130 degrees and bake for around 50 minutes or until the surface is slightly light brown and is hard if touched
  8. Switch off the oven, keep the oven door slightly open and allow it to cool inside the oven itself for around 30 minutes.
  9. Once cooled, transfer to wire rack
  10. Meanwhile, peel and cut the fruits
  11. In a cold vessel, take whipping cream and beat it until soft peaks are formed. (Add 1 tbsp sugar while beating if whipping cream is unsweetened)
  12. While assembling the Pavlova, put a dollop of whipped cream on the baked meringue based and smooth it from all the sides. Place a spoonful of fruit crush and then place cut fruits on top
  13. Enjoy the tasty Pavlova


Tip: If you are not assembling the Pavlovas immediately, baked meringue bases can be stored in airtight container in the refrigerator for 3-4 days

Coconut Milk & Mango Panna Cotta


For Coconut Milk Panna Cotta Layer:
Coconut milk          200 ml
Heavy cream          300 ml
Granulated Sugar    8 tbsp
Vanilla essence       1 tsp
Gelatin                    3 tsp
Water                               6 tbsp

For Mango Panna Cotta Layer
Mango Puree                    250 ml
Heavy Cream                   300 ml
Castor Sugar                    5 tbsp
Gelatin                              3 tsp
Cold Water                      6 tbsp

Method

For Coconut Milk Panna Cotta:
  1. Sprinkle gelatin over a cold water and leave for 5 mins to bloom
  2. In a heavy sauce pan heat together coconut milk, cream, vanilla essence and sugar  just till one boil (don’t over heat it)
  3. Take it off  the  stove and add white chocolate
  4. Add the gelatin mixture in it and stir well till dissolves
  5. Let it cool for 2-3 minutes
  6. Pour it in glasses to be served, tilt it in muffin pan to give an angle effect
  7. Refrigerate till set

For Mango Panna Cotta Layer:
  1. Sprinkle gelatin over 3 tbsp water and allow it to rest for 5 minutes
  2. In a pan heat sugar and cream till sugar is dissolved. (Do not boil it too much)
  3. Remove from heat, add gelatin mixture and stir until gelatin is dissolved completely        .
  4. Cool for 2-3 minutes.
  5. Add mango puree to the cream gelatin mixture and mix very well.
  6. Pour the mixture in the same glasses where coconut milk panna cotta is already set.
  7. Refrigerate till set.

Dulce De Leche

Wikipedia says that "Dulce De Leche" is South American Confection prepared by slowly heating sweetened milk. Literally translated, it means "candy of milk" or "milk toffee" or "candy jam". This can be used with cakes, jams or even as "bread spread". I came across Dulce De Leche when I was looking for recipe of Banoffee Pie. The most basic recipe for this "milk toffee" calls for slowly simmering milk and sugar together stirring continuously for long hours until the mixture thickens and caramelizes.

At home, usually Dulce De Leche is prepared by boiling an unopened can of condensed milk for 2-3 hours. But there is also a simpler or faster way to make it by using the pressure cooker. This is the method I used to make this delicious Dulce De Leche.


Ingredients:


Nestle Milkmaid / Amul Mithaimate Tin - 1 No.


Method:


  1. Take 8 or 10 ltrs. pressure cooker and fill it halfway with water
  2. Remove any plastic wrapper / cover from condensed milk tin, if any. Ensure that the can is not opened at all.
  3. Submerge the can fully, horizontally in water. Ensure that water is covering the can completely and is at least 2-3 inches above the top of the can.
  4. Cover the cooker lid, place the whistle / weight and pressure cook on medium  to high heat until one whistle. In my case, this took around 20 minutes 
  5. After the whistle, lower the heat to low and continue cooking for another 20-25 minutes with cooker lid as well as whistle still on (there will not be any more whistles while cooking on low heat)
  6. Turn off the heat and allow the pressure to drop.
  7. Open the cooker lid, remove the can carefully (remember that the can will be very hot)
  8. Allow the can to cool completely (it might take 1 to 1.5 hour)
  9. Once can cools, open the lid and relish your Dulce De Leche
  10. This can be stored in refrigerator for about 7 days (it will get thickened further after refrigeration. So, you can heat it in microwave for 1 minute or so before using it)
  11. You can also use 1 tsp vanilla essence before refrigeration.
Tip:
  1. During my first attempt, I used a smaller cooker and even if I lowered the heat to low after first whistle, it continued to whistle and then I turned off the gas after 3 whistles. I found that the final product was not caramelized properly. Probably, I could have continued cooking it further for 2-3 whistles
  2. Increasing or reducing the cooking time will make the final product thicken more or less. Adjust cooking time as per your taste in subsequent attempts